搜索到
296
篇与
的结果
-

-
评测脚本之内存检测脚本memtester-cpp FunctionClub大佬作品,本程序检测的可分配内存指的是用户使用时最大能占用的内存量。特点检测VPS真实可分配内存,适用于检测VPS超售情况使用 #CentOS / RHEL yum install wget -y yum groupinstall "Development Tools" -y wget https://raw.githubusercontent.com/FunctionClub/Memtester/master/memtester.cpp gcc -l stdc++ memtester.cpp ./a.out #Ubuntu / Debian apt-get update apt-get install wget build-essential -y wget https://raw.githubusercontent.com/FunctionClub/Memtester/master/memtester.cpp gcc -l stdc++ memtester.cpp ./a.out...
-
Typecho的原生评论区插入图片 只需要在主题的comment.php文件里面合适的位置添加下面代码即可。非常潦草,但是大致的功能实现了。<p style="height:2px"></p> <script LANGUAGE="JavaScript"> function openimgtp() {window.open ("https://imgse.com/upload", "newwindow", "height=600, width=800, top=100px,left=400px,toolbar =no, menubar=no, scrollbars=no, resizable=no, location=no, status=no")} </script> <div title="上传到图床后复制HTML代码到评论区窗口即可" class="smallscreen"><button type="button" onclick="openimgtp()" style="background-color:#ffffff;font-size:12px;border-color:#ffffff;z-index: 101;border-radius: 4px;">上传图片</button> (上传到图床后复制HTML图像代码到评论区即可)</div>...基于chevereto图床插件关于什么是chevereto,其实就是一个图床系统,路过图床、遇见图床都是基于这个框架。相关插件的使用说明可以阅读官方使用文档:Popup Upload Plugin-官方说明文档(需要注意的是,这段代码是经过优化的,而不是原生的pup.js代码。当然封装这段代码是更加正确的做法!)chevereto(); var isTrigger = false; function chevereto(){ (function() { for (var t = { defaultSettings: { url: "https://imgloc.com/upload", vendor: "auto", mode: "manual", lang: "auto", autoInsert: "html-embed", palette: "clear", init: "onload", containerClass: 1, buttonClass: 1, sibling: 0, siblingPos: "after", fitEditor: 0, observe: 0, observeCache: 1, html: '<div class="%cClass"><button %x class="%bClass"><span class="%iClass">%iconSvg</span><span class="%tClass">%text</span></button></div>', css: ".%cClass{display:inline-block;margin-top:5px;margin-bottom:5px}.%bClass{line-height:normal;-webkit-transition:all .2s;-o-transition:all .2s;transition:all .2s;outline:0;color:%2;border:none;cursor:pointer;border:1px solid rgba(0,0,0,.15);background:%1;border-radius:.2em;padding:.5em 1em;font-size:12px;font-weight:700;text-shadow:none}.%bClass:hover{background:%3;color:%4;border-color:rgba(0,0,0,.1)}.%iClass,.%tClass{display:inline-block;vertical-align:middle}.%iClass svg{display:block;width:1em;height:1em;fill:currentColor}.%tClass{margin-left:.25em}" }, ns: { plugin: "chevereto-pup" }, palettes: { default: ["#ececec", "#333", "#2980b9", "#fff"], clear: ["inherit", "inherit", "inherit", "#2980b9"], turquoise: ["#16a085", "#fff", "#1abc9c", "#fff"], green: ["#27ae60", "#fff", "#2ecc71", "#fff"], blue: ["#2980b9", "#fff", "#3498db", "#fff"], purple: ["#8e44ad", "#fff", "#9b59b6", "#fff"], darkblue: ["#2c3e50", "#fff", "#34495e", "#fff"], yellow: ["#f39c12", "#fff", "#f1c40f", "#fff"], orange: ["#d35400", "#fff", "#e67e22", "#fff"], red: ["#c0392b", "#fff", "#e74c3c", "#fff"], grey: ["#ececec", "#000", "#e0e0e0", "#000"], black: ["#333", "#fff", "#666", "#fff"] }, classProps: ["button", "container"], iconSvg: '<svg class="%iClass" xmlns="http://www.w3.org/2000/svg" width="100" height="100" viewBox="0 0 100 100"><path d="M76.7 87.5c12.8 0 23.3-13.3 23.3-29.4 0-13.6-5.2-25.7-15.4-27.5 0 0-3.5-0.7-5.6 1.7 0 0 0.6 9.4-2.9 12.6 0 0 8.7-32.4-23.7-32.4 -29.3 0-22.5 34.5-22.5 34.5 -5-6.4-0.6-19.6-0.6-19.6 -2.5-2.6-6.1-2.5-6.1-2.5C10.9 25 0 39.1 0 54.6c0 15.5 9.3 32.7 29.3 32.7 2 0 6.4 0 11.7 0V68.5h-13l22-22 22 22H59v18.8C68.6 87.4 76.7 87.5 76.7 87.5z" style="fill: currentcolor;"/></svg>', l10n: { ar: "تحميل الصور", cs: "Nahrát obrázky", da: "Upload billeder", de: "Bilder hochladen", es: "Subir imágenes", fi: "Lataa kuvia", fr: "Importer des images", id: "Unggah gambar", it: "Carica immagini", ja: "画像をアップロード", nb: "Last opp bilder", nl: "Upload afbeeldingen", pl: "Wyślij obrazy", pt_BR: "Enviar imagens", ru: "Загрузить изображения", tr: "Resim Yukle", uk: "Завантажити зображення", zh_CN: "上传图片", zh_TW: "上傳圖片" }, vendors: { default: { check: function() { return 1 }, getEditor: function() { var t = { textarea: { name: ["recaptcha", "search", "recipients", "coppa", "^comment_list", "username_list", "add"] }, ce: { dataset: ["gramm"] } }, e = ["~", "|", "^", "$", "*"], i = {}; for (var s in t) { i[s] = ""; var n = t[s]; for (var r in n) for (var o = 0; o < n[r].length; o++) { var a = "", l = n[r][o], d = l.charAt(0); e.indexOf(d) > -1 && (a = d, l = l.substring(1)), i[s] += ":not([" + ("dataset" == r ? "data-" + l: r + a + '="' + l + '"') + "])" } } return document.querySelectorAll('[contenteditable=""]' + i.ce + ',[contenteditable="true"]' + i.ce + ",textarea:not([readonly])" + i.textarea) } } }, generateGuid: function() { var t = (new Date).getTime(); return "undefined" != typeof performance && "function" == typeof performance.now && (t += performance.now()), "xxxxxxxx-xxxx-4xxx-yxxx-xxxxxxxxxxxx".replace(/[xy]/g, function(e) { var i = (t + 16 * Math.random()) % 16 | 0; return t = Math.floor(t / 16), ("x" === e ? i: 3 & i | 8).toString(16) }) }, getNewValue: function(t, e) { var i = "string" != typeof t.getAttribute("contenteditable") ? "value": "innerHTML", s = "value" == i ? "\n": "<br>", n = t[i], r = e, o = !1; if (o && (r = String(e).replace(/&/g, "&").replace(/</g, "<").replace(/>/g, ">").replace(/"/g, """)), 0 == n.length) return r; var a = "", l = n.match(/\n+$/g), d = l ? l[0].split("\n").length: 0; if (d <= 2) { var u = 0 == d ? 2 : 1; a += s.repeat(u) } return a + r }, insertTrigger: function() { var t, e = this.vendors[this.settings.vendor], i = this.settings.sibling ? document.querySelectorAll(this.settings.sibling + ":not([" + this.ns.dataPlugin + "])")[0] : 0; if ("auto" == this.settings.mode) t = this.vendors[e.hasOwnProperty("getEditor") ? this.settings.vendor: "default"].getEditor(); else { for (var s = document.querySelectorAll("[" + this.ns.dataPluginTrigger + "][data-target]:not([" + this.ns.dataPluginId + "])"), n = [], r = 0; r < s.length; r++) n.push(s[r].dataset.target); n.length > 0 && (t = document.querySelectorAll(n.join(","))) } if (t) { if (!document.getElementById(this.ns.pluginStyle) && this.settings.css) { var o = document.createElement("style"), a = this.settings.css; a = this.appyTemplate(a), o.type = "text/css", o.innerHTML = a.replace(/%p/g, "." + this.ns.plugin), o.setAttribute("id", this.ns.pluginStyle), document.body.appendChild(o) } t instanceof NodeList || (t = [t]); var l = 0; for (r = 0; r < t.length; r++) if (!t[r].getAttribute(this.ns.dataPluginTarget)) { var d = i || t[r]; d.setAttribute(this.ns.dataPlugin, "sibling"), d.insertAdjacentHTML({ before: "beforebegin", after: "afterend" } [this.settings.siblingPos], this.appyTemplate(this.settings.html)); var u = d.parentElement.querySelector("[" + this.ns.dataPluginTrigger + "]"); this.setBoundId(u, t[r]), l++ } this.triggerCounter = l, "function" == typeof e.callback && e.callback.call() } isTrigger = true; }, appyTemplate: function(t) { if (!this.cacheTable) { var e = [{ "%iconSvg": this.iconSvg }, { "%text": this.settings.langString }]; if (this.palette) { for (var i = /%(\d+)/g, s = i.exec(t), n = []; null !== s;) - 1 == n.indexOf(s[1]) && n.push(s[1]), s = i.exec(t); if (n) { n.sort(function(t, e) { return e - t }); this.vendors[this.settings.vendor]; for (var r = 0; r < n.length; r++) { var o = n[r] - 1, a = this.palette[o] || ""; a || "default" === this.settings.vendor || "default" === this.settings.palette || (a = this.palette[o - 2]); var l = {}; l["%" + n[r]] = a, e.push(l) } } } var d = this.settings.buttonClass || this.ns.plugin + "-button", u = [{ "%cClass": this.settings.containerClass || this.ns.plugin + "-container" }, { "%bClass": d }, { "%iClass": d + "-icon" }, { "%tClass": d + "-text" }, { "%x": this.ns.dataPluginTrigger }, { "%p": this.ns.plugin }]; for (r = 0; r < u.length; r++) e.push(u[r]); this.cacheTable = e } return this.strtr(t, this.cacheTable) }, strtr: function(t, e) { t = t.toString(); if (!t || void 0 === e) return t; for (var i = 0; i < e.length; i++) { var s = e[i]; for (var n in s) void 0 !== s[n] && (re = new RegExp(n, "g"), t = t.replace(re, s[n])) } return t }, setBoundId: function(t, e) { var i = this.generateGuid(); t.setAttribute(this.ns.dataPluginId, i), e.setAttribute(this.ns.dataPluginTarget, i) }, openPopup: function(t) { if ("string" == typeof t) { var e = this; if (void 0 === this.popups && (this.popups = {}), void 0 === this.popups[t]) { this.popups[t] = {}; var i = { l: null != window.screenLeft ? window.screenLeft: screen.left, t: null != window.screenTop ? window.screenTop: screen.top, w: window.innerWidth ? window.innerWidth: document.documentElement.clientWidth ? document.documentElement.clientWidth: screen.width, h: window.innerHeight ? window.innerHeight: document.documentElement.clientHeight ? document.documentElement.clientHeight: screen.height }, s = { w: 720, h: 690 }, n = { w: .5, h: .85 }; for (var r in s) s[r] / i[r] > n[r] && (s[r] = i[r] * n[r]); var o = { l: Math.trunc(i.w / 2 - s.w / 2 + i.l), t: Math.trunc(i.h / 2 - s.h / 2 + i.t) }; this.popups[t].window = window.open(this.settings.url, t, "width=" + s.w + ",height=" + s.h + ",top=" + o.t + ",left=" + o.l), this.popups[t].timer = window.setInterval(function() { e.popups[t].window && !1 === e.popups[t].window.closed || (window.clearInterval(e.popups[t].timer), e.popups[t] = void 0) }, 200) } else this.popups[t].window.focus() } }, postSettings: function(t) { this.popups[t].window.postMessage({ id: t, settings: this.settings }, this.settings.url) }, liveBind: function(t, e, i) { document.addEventListener(e, function(e) { var s = document.querySelectorAll(t); if (s) { for (var n = e.target, r = -1; n && -1 === (r = Array.prototype.indexOf.call(s, n));) n = n.parentElement; r > -1 && (e.preventDefault(), i.call(e, n)) } }, !0) }, prepare: function() { var t = this; this.ns.dataPlugin = "data-" + this.ns.plugin, this.ns.dataPluginId = this.ns.dataPlugin + "-id", this.ns.dataPluginTrigger = this.ns.dataPlugin + "-trigger", this.ns.dataPluginTarget = this.ns.dataPlugin + "-target", this.ns.pluginStyle = this.ns.plugin + "-style", this.ns.selDataPluginTrigger = "[" + this.ns.dataPluginTrigger + "]"; var e = document.currentScript || document.getElementById(this.ns.plugin + "-src"); e ? e.dataset.buttonTemplate && (e.dataset.html = e.dataset.buttonTemplate) : e = { dataset: {} }; var i = 0; for (var s in this.settings = {}, this.defaultSettings) { var n = e && e.dataset[s] ? e.dataset[s] : this.defaultSettings[s]; "1" !== n && "0" !== n || (n = "true" == n), "string" == typeof n && this.classProps.indexOf(s.replace(/Class$/, "")) > -1 && (i = 1), this.settings[s] = n } if ("auto" == this.settings.vendor) for (var s in this.settings.vendor = "default", this.settings.fitEditor = 0, this.vendors) if ("default" != s && void 0 !== window[this.vendors[s].check]) { this.settings.vendor = s; break } var r = ["lang", "url", "vendor", "target"]; "default" == this.settings.vendor && (this.vendors. default.settings = {}); var o = this.vendors[this.settings.vendor]; if (o.settings) for (var s in o.settings) e && e.dataset.hasOwnProperty(s) || (this.settings[s] = o.settings[s]); else for (var s in o.settings = {}, this.defaultSettings) - 1 == r.indexOf(s) && (o.settings[s] = this.defaultSettings[s]); if ("default" !== this.settings.vendor) if (o.settings.hasOwnProperty("fitEditor") || e.dataset.hasOwnProperty("fitEditor") || (this.settings.fitEditor = 1), this.settings.fitEditor) i = !o.settings.css; else { r = ["autoInsert", "observe", "observeCache"]; for (var s in o.settings) - 1 != r.indexOf(s) || e.dataset.hasOwnProperty(s) || (this.settings[s] = this.defaultSettings[s]) } if (i) this.settings.css = ""; else { this.settings.css = this.settings.css.replace("%defaultCSS", this.defaultSettings.css), o.settings.extracss && this.settings.css && (this.settings.css += o.settings.extracss); var a = this.settings.palette.split(","); a.length > 1 ? this.palette = a: this.palettes.hasOwnProperty(a) || (this.settings.palette = "default"), this.palette || (this.palette = (this.settings.fitEditor && o.palettes && o.palettes[this.settings.palette] ? o: this).palettes[this.settings.palette]) } for (var l = this.classProps, d = 0; d < l.length; d++) { var u = l[d] + "Class"; "string" != typeof this.settings[u] && (this.settings[u] = this.ns.plugin + "-" + l[d], this.settings.fitEditor && (this.settings[u] += "--" + this.settings.vendor)) } var c = ("auto" == this.settings.lang ? navigator.language || navigator.userLanguage: this.settings.lang).replace("-", "_"); this.settings.langString = "Upload images"; var g = c in this.l10n ? c: c.substring(0, 2) in this.l10n ? c.substring(0, 2) : null; g && (this.settings.langString = this.l10n[g]); var h = document.createElement("a"); h.href = this.settings.url, this.originUrlPattern = "^" + (h.protocol + "//" + h.hostname).replace(/\./g, "\\.").replace(/\//g, "\\/") + "$"; var f = document.querySelectorAll(this.ns.selDataPluginTrigger + "[data-target]"); if (f.length > 0) for (d = 0; d < f.length; d++) { var p = document.querySelector(f[d].dataset.target); this.setBoundId(f[d], p) } if (this.settings.observe) { var b = this.settings.observe; this.settings.observeCache && (b += ":not([" + this.ns.dataPlugin + "])"), this.liveBind(b, "click", function(e) { e.setAttribute(t.ns.dataPlugin, 1), t.observe() }.bind(this)) } this.settings.sibling && !this.settings.onDemand ? this.waitForSibling() : "onload" == this.settings.init ? "loading" === document.readyState ? document.addEventListener("DOMContentLoaded", function(e) { t.init() }, !1) : this.init() : this.observe() }, observe: function() { this.waitForSibling("observe") }, waitForSibling: function(t) { var e = this.initialized ? "insertTrigger": "init"; if (this.settings.sibling) var i = document.querySelector(this.settings.sibling + ":not([" + this.ns.dataPlugin + "])"); else if ("observe" == t && (this[e](), this.triggerCounter)) return; if (i) this[e](); else { if ("complete" === document.readyState && "observe" !== t) return; setTimeout(("observe" == t ? this.observe: this.waitForSibling).bind(this), 250) } }, init: function() { if(isTrigger === true) { return; } this.insertTrigger(); var t = this, e = this.vendors[this.settings.vendor]; this.liveBind(this.ns.selDataPluginTrigger, "click", function(e) { var i = e.getAttribute(t.ns.dataPluginId); t.openPopup(i) }), window.addEventListener("message", function(i) { var s = new RegExp(t.originUrlPattern, "i"); if (s.test(i.origin) || void 0 !== i.data.id && void 0 !== i.data.message) { var n = i.data.id; if (n && i.source === t.popups[n].window) if (i.data.requestAction && t.hasOwnProperty(i.data.requestAction)) t[i.data.requestAction](n); else { var r; if ("default" !== t.settings.vendor) { if (e.hasOwnProperty("useCustomEditor") && e.useCustomEditor()) return void e.editorValue(i.data.message, n); e.hasOwnProperty("getEditor") && (r = e.getEditor()) } if (r || (r = document.querySelector("[" + t.ns.dataPluginTarget + '="' + n + '"]'), r)) { var o = null === r.getAttribute("contenteditable") ? "value": "innerHTML"; r[o] += t.getNewValue(r, i.data.message); for (var a = ["blur", "focus", "input", "change", "paste"], l = 0; l < a.length; l++) { var d = new Event(a[l]); r.dispatchEvent(d) } } else alert("Target not found") } } }, !1), this.initialized = 1 } }, e = ["WoltLab", "XF1"], i = 0; i < e.length; i++) t.vendors[e[i]] = Object.assign(Object.assign({}, t.vendors.redactor2), t.vendors[e[i]]); t.prepare() })(); };...上面的js代码确实挺长,你可以封装到一个js文件,然后在head标签中引入,这样可以优化网页的格式。然后就是调用了。在主题的comment.php位置,插入调用的button代码:<div class="OwO padder-v-sm" style="display:inline"></div><p style="height:2px"></p> <div title="上传到图床后自动插入HTML代码" class="smallscreen"> <button type="button" data-chevereto-pup-trigger data-target="#comment" style="background-color:#ffffff;font-size:12px;border-color:#ffffff;z-index: 101;border-radius: 4px;">上传图片</button> </div>...备用chevereto图床这里推荐几个备用的图床,都是基于chevereto的框架,如果想更换图床,可以直接把js代码里面的defaultSettings下的url进行修改即可。非常的便捷。1、路过图床(运营稳定的图床):https://imgse.com/upload2、七喜图床(速度很快的图床):https://7up.pics/upload3、老王图床:https://img.gejiba.com/upload4、loc图床:https://imgloc.com/upload5、picgo图床:https://www.picgo.net/upload6、ImgBB图床:https://imgbb.com/upload7、MJJTODAY:https://mjj.today/upload
-
懒人站长专享:零基础制作网站LOGO和站点ICO图标 网站logo是品牌形象的重要组成部分,对网站的成功起着至关重要的作用。一个设计精美的logo能帮助你吸引更多的用户,提升品牌知名度,并最终实现商业目标。1. 在线LOGO制作1)打开U钙网 https://www.uugai.com/U钙网简介:是一个专业的智能AI商标logo设计平台,无论你董不懂设计,仅需输入文字,您就可以自助设计出专业、精美的LOGO标志,100%U钙网原创,无限制免费下载,十几年专业专注智能LOGO设计,服务用户已超千万。2)输入LOGO名字后,点击开始制作;3)选择你中意的LOGO,随后的进入页面可以选择底色和主题色;4)点击上方的动物图标,可以选择各种动物图标、字母图标等,发挥你的想象力,之后选择下载LOGO就行了,是不是很简单。2. 在线ICO制作接下来讲下如何生成站点ICO1)打开ICO制作网站: https://tool.lu/favicon ;2)点击选择图片,这里可以选择刚才制作的LOGO;3)移动选择框,选择你需要的部分,选择ICO大小,选择格式为ICO,之后下载到自己电脑并上传网站就好了。
-
创建一个用于typecho的采集插件 farea[/farea]不得不佩服现在AI的强大。创建一个用于 Typecho 的采集器插件需要掌握 PHP 和 Typecho 的插件开发机制。以下是一个简化版的 Typecho 插件代码模板,可以通过它采集指定网站的内容并发布到 Typecho 中。插件文件结构在 Typecho 的 usr/plugins 目录下新建一个文件夹,例如 ContentCollector,并创建 Plugin.php 文件。usr/├── plugins/│ ├── ContentCollector/│ │ ├── Plugin.phpPlugin.php 插件代码<?phpif (!defined('__TYPECHO_ROOT_DIR__')) exit;/**ContentCollector 插件一个简单的内容采集插件,支持从目标网站抓取内容并发布到 Typecho 中。@package ContentCollector@author Your Name@version 1.0.0@link https://yourwebsite.com */class ContentCollector_Plugin implements Typecho_Plugin_Interface{/** * 激活插件 */ public static function activate() { Helper::addPanel(1, 'ContentCollector/panel.php', '采集器', '采集内容', 'administrator'); return _t('插件已激活,采集器面板已添加。'); } /** * 禁用插件 */ public static function deactivate() { Helper::removePanel(1, 'ContentCollector/panel.php'); } /** * 插件配置面板 */ public static function config(Typecho_Widget_Helper_Form $form) { $url = new Typecho_Widget_Helper_Form_Element_Text('targetUrl', null, '', _t('目标网站 URL'), _t('请输入要采集的目标网站地址')); $form->addInput($url); $selector = new Typecho_Widget_Helper_Form_Element_Text('contentSelector', null, '', _t('内容选择器'), _t('请输入用于提取内容的 CSS 选择器')); $form->addInput($selector); } /** * 个人用户的配置面板 */ public static function personalConfig(Typecho_Widget_Helper_Form $form) {} /** * 插件实现逻辑 */ public static function collectContent($url, $selector) { // 使用 cURL 或 file_get_contents 抓取内容 $html = file_get_contents($url); if (!$html) { throw new Exception(_t('无法获取目标网站内容')); } // 使用 DOMDocument 或类似库解析 HTML $dom = new DOMDocument(); @$dom->loadHTML($html); $xpath = new DOMXPath($dom); // 使用选择器提取内容 $nodes = $xpath->query($selector); $content = ''; foreach ($nodes as $node) { $content .= $dom->saveHTML($node); } return $content; } /** * 发布到 Typecho */ public static function publishContent($title, $content) { $db = Typecho_Db::get(); $post = array( 'title' => $title, 'text' => $content, 'slug' => Typecho_Common::slugName($title), 'created' => time(), 'modified' => time(), 'type' => 'post', 'status' => 'publish', 'authorId' => Typecho_Widget::widget('Widget_User')->uid, ); $db->query($db->insert('table.contents')->rows($post)); }}创建采集面板 panel.php在 ContentCollector 文件夹下新建 panel.php 文件:<?phpif (!defined('__TYPECHO_ADMIN__')) exit;$this->need('header.php');?>采集器 目标 URL: 内容选择器: 文章标题: 采集并发布 <?phpif (isset($_POST['collect'])) {$url = $_POST['url']; $selector = $_POST['selector']; $title = $_POST['title']; try { $content = ContentCollector_Plugin::collectContent($url, $selector); ContentCollector_Plugin::publishContent($title, $content); echo '<p>内容已成功采集并发布!</p>'; } catch (Exception $e) { echo '<p>错误:' . $e->getMessage() . '</p>'; }}$this->need('footer.php');?>使用说明将 ContentCollector 文件夹放到 usr/plugins/ 目录。登录 Typecho 后台,启用 ContentCollector 插件。在后台的“采集器”面板中输入目标 URL 和选择器,点击采集。注意事项此插件是基础版本,仅用于教学目的。实际使用时需要考虑目标网站的内容版权。可以结合更强大的解析库(如 Guzzle、Symfony DomCrawler)提升稳定性和功能。
-
解决 nginx报错: [warn] the "listen ... http2" directive is deprecated, use the "http2" directive instead in /usr/local/nginx/conf/vhost/xxx.com.conf:18 在 1.25.1 版本后的 nginx 运行日志中,可能会发现以下警告信息: [warn] the "listen ... http2" directive is deprecated, use the "http2" directive instead in /usr/local/nginx/conf/vhost/xxx.com.conf:18原配置:listen 443 ssl http2;修改配置为:`listen 443 ssl;http2 on;`重启 nginx 即可。参考:https://github.com/nginxinc/kubernetes-ingress/issues/4237
-
sing-box 基础教程:sing-box 的配置方法和使用教程 sing-box 是什么sing-box 是新一代超强通用代理工具,对标 ray core 与 clash,而且它的性能以及支持的协议类型已经超过了 ray core 与 clash。目前支持以下协议:入站:Shadowsocks(including shadowsocks2022) Vmess Trojan Naive Hysteria ShadowTLS Vless Tuic Tun Redirect TProxy Socks HTTP出站:Shadowsocks(including shadowsocks2022) Vmess Trojan Wireguard Hysteria ShadowTLS ShadowsocksR VLESS Tuic Hysteria2 Tor SSH DNS关于如何在VPS安装Singbox服务器端可以查阅之前教程:233boy sing-box 一键安装脚本除了命令行客户端以外,还提供了图形界面客户端,图形界面支持 Android、iOS、macOS 以及 Apple tvOS,Windows 暂时不支持,还在施工中 这简直就是魔法上网界的瑞士军刀啊!而且所有的客户端都是免费的,iOS 端也不用再买 Shadowrocket 小火箭等付费 App 了。再看看隔壁 Surge 的价格,你玩我呢??还是 sing-box 香。本文将会手把手教大家如何使用 sing-box 来实现任意机器的全局透明代理。sing-box 客户端下载第一步先解决客户端下载的问题。AndroidAndroid 客户端可以到 Play Store 中去下载,也可以直接到 GitHub Releases 页面下载。如果你是 Android 的 Magisk/KernelSU 玩家,可以选择刷入 box_for_magisk模块。Apple 平台iOS/macOS/Apple tvOS 用户可以到 App Store 中下载(前提是你得有个美区 ID),也可以使用 Homebrew 直接安装:$ brew install sfm除此之外你也可以直接到 GitHub Releases 页面下载客户端或者命令行版本。WindowsWindows 没有图形界面客户端,官方还正在开发中,不过可以直接使用包管理器 Sccop 或者 Chocolatey 安装命令行版本:# Sccop $ scoop install sing-box # Chocolatey $ choco install sing-box你也可以选择第三方开发者开发的图形界面客户端: GUI.for.SingBox还有一个更加成熟的第三方客户端: Hiddify-NextLinuxLinux 就很简单了,直接到 GitHub Releases 页面下载命令行版本即可。sing-box 配置解析sing-box 的核心就是它的配置,所有的配置都在一个 JSON 文件里,每个配置参数的含义可参考 sing-box 官方文档。但是为了能够快速使用起来,我们需要一个示例模板。没问题,我这就给你一个比较完美的透明代理模板:sing-box 透明代理示例模板下面我来给大家解析一下里面的配置,首先来看 DNS 部分。如果你嫌下面的解析太长不看,那就直接使用我的示例模板配置好了。DNS 配置sing-box 对 DNS 的处理比 Clash 强太多了,支持各种分流规则,结构如下:{ "dns": { "servers": [], "rules": [], "final": "", "strategy": "", "disable_cache": false, "disable_expire": false, "independent_cache": false, "reverse_mapping": false, "fakeip": {} } }其中 servers 定义了 DNS 服务器,具体参数含义我就不解释了,自己看官方文档。我给出的 DNS 服务器配置是:{ "dns": { "servers": [ { "tag": "dns_proxy", "address": "https://1.1.1.1/dns-query", "address_resolver": "dns_resolver", "strategy": "ipv4_only", "detour": "select" }, { "tag": "dns_direct", "address": "h3://dns.alidns.com/dns-query", "address_resolver": "dns_resolver", "strategy": "ipv4_only", "detour": "direct" }, { "tag": "dns_block", "address": "rcode://refused" }, { "tag": "dns_resolver", "address": "223.5.5.5", "strategy": "ipv4_only", "detour": "direct" } ] } }这里定义了 3 个 DNS 服务器,当你发起一个域名解析请求时,这些服务器会被用来查找对应的 IP 地址。同时还定义了一个 RCode 协议用来屏蔽请求。rules 定义了 DNS 规则,这些规则用于定义哪些域名应该使用哪个 DNS 服务器解析。它可以让你根据域名的特定模式选择不同的 DNS 服务器。DNS 规则如下:{ "dns": { "rules": [ { "outbound": "any", "server": "dns_resolver" // 注释:对于任何出站连接(不管是直接连接还是通过代理),使用 "dns_resolver" 服务器进行 DNS 解析(这一句主要用来解析代理节点本身的 IP 地址)。 }, { "clash_mode": "direct", "server": "dns_direct" // 注释:在直连模式(不经过代理)下,使用 "dns_direct" 服务器进行 DNS 解析。 }, { "clash_mode": "global", "server": "dns_proxy" // 注释:在全局代理模式下,使用 "dns_proxy" 服务器进行 DNS 解析。 }, { "process_name": [ "TencentMeeting", "NemoDesktop", "ToDesk", "ToDesk_Service", "WeChat", "Tailscale", "wireguard-go", "Tunnelblick", "softwareupdated", "kubectl" ], "server": "dns_direct" // 注释:当特定的进程(如 TencentMeeting、WeChat 等)发起 DNS 请求时,使用 "dns_direct" 服务器进行直连 DNS 解析。 }, { "domain_suffix": [ "icloudnative.io", "fuckcloudnative.io", "sealos.io", "cdn.jsdelivr.net" ], "server": "dns_direct" // 注释:对于特定后缀的域名(如 icloudnative.io 等),使用 "dns_direct" 服务器进行直连 DNS 解析。 }, { "process_name": ["DropboxMacUpdate", "Dropbox"], "server": "dns_proxy" // 注释:当 Dropbox 相关进程发起 DNS 请求时,使用 "dns_proxy" 服务器通过代理进行 DNS 解析。 }, { "package_name": [ "com.google.android.youtube", "com.android.vending", "org.telegram.messenger", "org.telegram.plus" ], "server": "dns_proxy" // 注释:对于特定的 Android 应用包名(如 YouTube、Telegram 等),使用 "dns_proxy" 服务器通过代理进行 DNS 解析。 }, { "rule_set": "geosite-geolocation-!cn", "server": "dns_proxy" // 注释:对于 geosite 数据库中定义的非中国地区的地理位置相关的域名,使用 "dns_proxy" 服务器通过代理进行 DNS 解析。 }, { "rule_set": "Global", "server": "dns_proxy" // 注释:对于定义在 "Global" 规则集中的域名,使用 "dns_proxy" 服务器通过代理进行 DNS 解析。 }, { "rule_set": [ "YouTube", "Telegram", "Netflix", "geoip-google", "geoip-telegram", "geoip-twitter", "geoip-netflix" ], "server": "dns_proxy" // 注释:对于特定的服务和地理位置相关的域名(如 YouTube、Netflix、谷歌、Telegram 相关的域名),使用 "dns_proxy" 服务器通过代理进行 DNS 解析。 } ], "final": "dns_direct" // 注释:如果上述规则都不适用,则默认使用 "dns_direct" 服务器进行直连 DNS 解析。 } }入站配置接下来比较重要的就是入站规则了,入站(Inbound)在网络领域,特别是在代理和网络路由配置中,通常指的是进入某个系统或网络的数据流。在 sing-box 中,入站配置定义了如何处理进入代理服务器的数据。入站配置示例如下:{ "inbounds": [ { "type": "tun", "inet4_address": "198.18.0.1/16", "auto_route": true, "exclude_package": [ "cmb.pb", "cn.gov.pbc.dcep", "com.MobileTicket", "com.adguard.android", "com.ainemo.dragoon", "com.alibaba.android.rimet", "com.alicloud.databox", "com.amazing.cloudisk.tv", "com.autonavi.minimap", "com.bilibili.app.in", "com.bishua666.luxxx1", "com.cainiao.wireless", "com.chebada", "com.chinamworld.main", "com.cmbchina.ccd.pluto.cmbActivity", "com.coolapk.market", "com.ctrip.ct", "com.dianping.v1", "com.douban.frodo", "com.eg.android.AlipayGphone", "com.farplace.qingzhuo", "com.hanweb.android.zhejiang.activity", "com.leoao.fitness", "com.lucinhu.bili_you", "com.mikrotik.android.tikapp", "com.moji.mjweather", "com.motorola.cn.calendar", "com.motorola.cn.lrhealth", "com.netease.cloudmusic", "com.sankuai.meituan", "com.sina.weibo", "com.smartisan.notes", "com.sohu.inputmethod.sogou.moto", "com.sonelli.juicessh", "com.ss.android.article.news", "com.ss.android.lark", "com.ss.android.ugc.aweme", "com.tailscale.ipn", "com.taobao.idlefish", "com.taobao.taobao", "com.tencent.mm", "com.tencent.mp", "com.tencent.soter.soterserver", "com.tencent.wemeet.app", "com.tencent.weread", "com.tencent.wework", "com.ttxapps.wifiadb", "com.unionpay", "com.unnoo.quan", "com.wireguard.android", "com.xingin.xhs", "com.xunmeng.pinduoduo", "com.zui.zhealthy", "ctrip.android.view", "io.kubenav.kubenav", "org.geekbang.geekTime", "tv.danmaku.bili" ], "stack": "mixed", "sniff": true }, { "type": "socks", "tag": "socks-in", "listen": "::", "listen_port": 5353 } ] }下面是对每个字段的详细注释:第一个入站连接的配置:type: "tun" 表示这是一个 tun 虚拟网络接口的配置。 inet4_address: "198.18.0.1/16" 设定了虚拟网络接口的 IPv4 地址和子网掩码。 auto_route: true 表示将自动处理路由,确保数据包正确传输。 exclude_package: 这是一个数组,包含了不通过此虚拟网络接口处理的 Android 应用程序包名列表。列出的 Android 应用程序将使用常规网络接口而不是虚拟接口。 stack: "mixed" 表示混合 system TCP 栈与 gvisor UDP 栈。 sniff: true 表示启用流量嗅探功能,以便自动检测和处理传入的数据流类型。第二个入站连接的配置:type: "socks" 表示这是一个 SOCKS 代理配置。 tag: "socks-in" 为这个入站连接定义了一个标签,方便在其它配置中引用。 listen: "::" 表示监听所有 IPv6 地址。如果需要监听所有 IPv4 地址,可以使用 "0.0.0.0"。 listen_port: 5353 定义了 SOCKS 代理监听的端口号。 其中 tun 接口是核心部分,我们将利用 tun 接口来实现全局透明代理。出站配置出站(Outbound)是指从本地网络或设备发出,向外部网络、服务或互联网发送的数据流量。示例出站配置如下:{ "outbounds": [ { "type": "selector", // 类型为选择器,用于在多个出站中选择一个 "tag": "select", // 标签名为 "select" "outbounds": [ "trojan-out" // 可选择的出站列表,这里只有 "trojan-out" ], "default": "trojan-out" // 默认选择的出站为 "trojan-out" }, { "type": "selector", // 同样是选择器类型 "tag": "openai", // 标签名为 "openai" "outbounds": [ "trojan-out" // 可选择的出站仍然是 "trojan-out" ], "default": "trojan-out" // 默认选择的出站同样是 "trojan-out" }, { "type": "selector", // 选择器类型 "tag": "tiktok", // 标签名为 "tiktok" "outbounds": [ "trojan-out" // 可选择的出站是 "trojan-out" ], "default": "trojan-out" // 默认选择的出站为 "trojan-out" }, { "type": "trojan", // 类型为 Trojan "tag": "trojan-out", // 标签名为 "trojan-out" "server": "xxxxxxxx", // Trojan 服务器地址 "server_port": 9443, // Trojan 服务器端口 "password": "xxxxxxxx", // Trojan 连接密码 "tls": { "enabled": true, // 启用 TLS 加密 "server_name": "xxxxxxxx", // TLS 服务器名称 "insecure": true, // 不验证 TLS 证书,用于自签名证书 "utls": { "fingerprint": "chrome" // 使用 Chrome 的 TLS 指纹 } }, "multiplex": { "protocol": "h2mux", // 使用 h2mux 多路复用协议 "max_connections": 4, // 最大连接数为 4 "min_streams": 4 // 每个连接的最小流数为 4 }, "transport": { "type": "grpc", // 传输协议为 gRPC "service_name": "TunService" // gRPC 服务名称 } }, { "type": "direct", // 直连类型,不通过代理直接访问 "tag": "direct" // 标签名为 "direct" }, { "type": "block", // 阻止类型,用于拦截流量 "tag": "block" // 标签名为 "block" }, { "type": "dns", // DNS 类型,用于 DNS 查询 "tag": "dns-out" // 标签名为 "dns-out" } ] }这个配置定义了不同类型的出站连接方式,包括选择器、Trojan、直连、阻止和 DNS 类型。每种类型都通过标签进行标识,便于在后续的路由规则中引用。路由配置路由部分才是 sing-box 的核心配置,这个部分定义了一系列规则和参数,用于决定如何处理不同的网络请求。通过这些规则和参数,sing-box 可以非常灵活地处理复杂的路由需求,包括基于地理位置、IP 地址、端口号、域名等多种条件的流量分流。配置结构如下:{ "route": { "rules": [], "rule_set": [], "final": "direct", // "final" 字段定义了默认的路由行为。这里设置为 "direct",意味着如果没有匹配任何规则,流量将直接(不经代理)发送。 "auto_detect_interface": true // 表示自动检测网络接口。这有助于自动适应网络变化,确保路由正确。 } }其中的核心配置:路由规则 (rules): 这些规则定义了如何根据不同的条件将流量定向到不同的出站连接。每个规则可以包括多个条件,如域名、IP 地址、端口号、网络协议等。规则集 (rule_set): 从 sing-box 1.8.0 版本开始,规则可以组合成规则集,这使得配置更加灵活和模块化。路由规则以下是我给出的路由规则示例:{ "route": { "rules": [ { "protocol": "dns", // 使用DNS协议的流量 "outbound": "dns-out" // 将通过'dns-out'出口转发 }, { "clash_mode": "direct", // Clash模式为直连 "outbound": "direct" // 将通过'direct'出口直接连接 }, { "clash_mode": "global", // Clash模式为全局 "outbound": "select" // 将通过'select'出口选择转发 }, { "domain_suffix": [ // 特定后缀的域名 "icloudnative.io", "fuckcloudnative.io", "sealos.io", "cdn.jsdelivr.net" ], "outbound": "direct" // 将通过'direct'出口直接连接 }, { "process_name": [ // 特定进程名称 "TencentMeeting", "NemoDesktop", ... ], "outbound": "direct" // 将通过'direct'出口直接连接 }, { "rule_set": [ // 特定的规则集 "WeChat", "Bilibili" ], "outbound": "direct" // 将通过'direct'出口直接连接 }, { "protocol": "quic", // 使用QUIC协议的流量 "outbound": "block" // 将被阻止 }, { "inbound": "socks-in", // 来自'socks-in'入口的流量 "outbound": "select" // 将通过'select'出口选择转发 }, { "rule_set": "OpenAI", // OpenAI规则集 "outbound": "openai" // 将通过'openai'出口转发 }, { "domain_suffix": [ // OpenAI相关的域名后缀 "openai.com", "oaistatic.com", "oaiusercontent.com" ], "outbound": "openai" // 将通过'openai'出口转发 }, { "package_name": "com.openai.chatgpt", // OpenAI ChatGPT应用包名 "outbound": "openai" // 将通过'openai'出口转发 }, { "rule_set": "TikTok", // TikTok规则集 "outbound": "tiktok" // 将通过'tiktok'出口转发 }, { "package_name": "com.zhiliaoapp.musically", // TikTok应用包名 "outbound": "tiktok" // 将通过'tiktok'出口转发 }, { "domain_suffix": [ // 特定的域名后缀 "depay.one", "orbstack.dev" ], "outbound": "select" // 将通过'select'出口选择转发 }, { "process_name": [ // 特定的进程名称 "DropboxMacUpdate", "Dropbox" ], "outbound": "select" // 将通过'select'出口选择转发 }, { "package_name": [ // 特定应用包名 "com.google.android.youtube", ... ], "outbound": "select" // 将通过'select'出口选择转发 }, { "domain": "accounts.google.com", // 特定的域名 "domain_suffix": [ // 特定的域名后缀 "sourceforge.net", "fhjasokiwq.com" ], "outbound": "select" // 将通过'select'出口选择转发 }, { "domain_suffix": "cloud.sealos.io", // 特定的域名后缀 "outbound": "direct" // 将通过'direct'出口直接连接 }, { "type": "logical", // 逻辑类型规则 "mode": "and", // 使用'and'模式 "rules": [ // 组合规则 { "rule_set": "geosite-geolocation-!cn" }, { "rule_set": "geoip-cn", "invert": true } ], "outbound": "select" // 将通过'select'出口选择转发 }, { "rule_set": "Global", // Global规则集 "outbound": "select" // 将通过'select'出口选择转发 }, { "rule_set": "geoip-cn", // 中国地理位置IP规则集 "outbound": "direct" // 将通过'direct'出口直接连接 }, { "ip_is_private": true, // 私有IP地址 "outbound": "direct" // 将通过'direct'出口直接连接 }, { "rule_set": [ // 特定的规则集 "YouTube", "Telegram", "Netflix", "geoip-google", "geoip-telegram", "geoip-twitter", "geoip-netflix" ], "outbound": "select" // 将通过'select'出口选择转发 } ] } }这个配置定义了不同类型的流量(如基于协议、域名后缀、应用包名、进程名称等)如何被路由。每条规则都指定了一种流量类型和相应的“出口”,即流量应该如何被处理或转发。这种灵活的路由配置可以非常精确地控制网络流量。规则集以下是我给出的规则集示例:{ "route": { "rule_set": [ { "type": "remote", "tag": "geosite-geolocation-!cn", "format": "binary", "url": "https://mirror.ghproxy.com/https://raw.githubusercontent.com/SagerNet/sing-geosite/rule-set/geosite-geolocation-!cn.srs", "download_detour": "direct" }, { "type": "remote", "tag": "geoip-cn", "format": "binary", "url": "https://mirror.ghproxy.com/https://raw.githubusercontent.com/CHIZI-0618/v2ray-rules-dat/release/singbox_ip_rule_set/geoip-cn.srs", "download_detour": "direct" }, { "type": "remote", "tag": "geoip-google", "format": "binary", "url": "https://mirror.ghproxy.com/https://raw.githubusercontent.com/CHIZI-0618/v2ray-rules-dat/release/singbox_ip_rule_set/geoip-google.srs", "download_detour": "direct" }, { "type": "remote", "tag": "geoip-telegram", "format": "binary", "url": "https://mirror.ghproxy.com/https://raw.githubusercontent.com/CHIZI-0618/v2ray-rules-dat/release/singbox_ip_rule_set/geoip-telegram.srs", "download_detour": "direct" }, { "type": "remote", "tag": "geoip-twitter", "format": "binary", "url": "https://mirror.ghproxy.com/https://raw.githubusercontent.com/CHIZI-0618/v2ray-rules-dat/release/singbox_ip_rule_set/geoip-twitter.srs", "download_detour": "direct" }, { "type": "remote", "tag": "geoip-netflix", "format": "binary", "url": "https://mirror.ghproxy.com/https://raw.githubusercontent.com/CHIZI-0618/v2ray-rules-dat/release/singbox_ip_rule_set/geoip-netflix.srs", "download_detour": "direct" }, { "type": "remote", "tag": "Global", "format": "source", "url": "https://mirror.ghproxy.com/https://raw.githubusercontent.com/yangchuansheng/sing-box-geosite/main/rule/Global.json", "download_detour": "direct" }, { "type": "remote", "tag": "YouTube", "format": "source", "url": "https://mirror.ghproxy.com/https://raw.githubusercontent.com/yangchuansheng/sing-box-geosite/main/rule/YouTube.json", "download_detour": "direct" }, { "type": "remote", "tag": "OpenAI", "format": "source", "url": "https://mirror.ghproxy.com/https://raw.githubusercontent.com/yangchuansheng/sing-box-geosite/main/rule/OpenAI.json", "download_detour": "direct" }, { "type": "remote", "tag": "TikTok", "format": "source", "url": "https://mirror.ghproxy.com/https://raw.githubusercontent.com/yangchuansheng/sing-box-geosite/main/rule/TikTok.json", "download_detour": "direct" }, { "type": "remote", "tag": "Telegram", "format": "source", "url": "https://mirror.ghproxy.com/https://raw.githubusercontent.com/yangchuansheng/sing-box-geosite/main/rule/Telegram.json", "download_detour": "direct" }, { "type": "remote", "tag": "Netflix", "format": "source", "url": "https://mirror.ghproxy.com/https://raw.githubusercontent.com/yangchuansheng/sing-box-geosite/main/rule/Netflix.json", "download_detour": "direct" }, { "type": "remote", "tag": "WeChat", "format": "source", "url": "https://mirror.ghproxy.com/https://raw.githubusercontent.com/yangchuansheng/sing-box-geosite/main/rule/WeChat.json", "download_detour": "direct" }, { "type": "remote", "tag": "Bilibili", "format": "source", "url": "https://mirror.ghproxy.com/https://raw.githubusercontent.com/yangchuansheng/sing-box-geosite/main/rule/Bilibili.json", "download_detour": "direct" } ] } }这里有两种不同类型的规则集,一种是 binary,另外一种是 source。binary 规则集一般都是利用 GEOSITE 或者 GEOIP 直接编译好的二进制规则,它们被直接嵌入到应用程序中。而 source 规则集就和 Clash 的 ruleset 比较类似,它是一个文本文件,而不是二进制。目前已经有相关项目可以自动将网络上的 Clash Ruleset 规则自动转换为 sing-box 的 source 规则集,感兴趣的同学可以参考这个项目: sing-box-geositeClash API最后的实验性配置用来开启 Clash API。没错,sing-box 是兼容 Clash API 滴!那么我们就可以使用 Clash 的 dashboard 来管理 sing-box 了,直接用这个项目好了: metacubexd示例配置如下:{ "experimental": { "cache_file": { "enabled": true // 启用缓存文件功能。当此项设置为true时,启用 DNS 查询的缓存,以便加快后续相同查询的响应速度。 }, "clash_api": { "external_controller": "0.0.0.0:9090", // 定义 Clash API 的外部控制器地址。"0.0.0.0:9090" 表示在本机的9090端口上监听外部的连接请求。 "external_ui": "metacubexd", // 指定外部用户界面(UI)的名称。这里的 "metacubexd" 是一个自定义 UI 的名称。 "external_ui_download_url": "https://github.com/MetaCubeX/metacubexd/archive/refs/heads/gh-pages.zip", // 提供外部 UI 的下载 URL。这个 URL 是从 GitHub 上下载 "metacubexd" UI 的压缩包。 "external_ui_download_detour": "select", // 定义下载外部 UI 时使用的转发策略。"select" 表示将通过'select'出口选择转发 "default_mode": "rule" // 设置 Clash API 的默认模式。"rule" 模式意味着流量将根据用户定义的规则进行路由。 } } }最终启动 sing-box 之后就可以通过 Clash dashboard 来查看和管理流量啦:注意: 图形界面客户端会自动把外部控制器相关的配置给屏蔽掉,如果你想使用 Dashboard,只能使用命令行来启动 sing-box。订阅转换我想大部分小伙伴使用的还是订阅链接,不可能傻乎乎的自己写配置和规则。但是目前大部分ji场都不提供 sing-box 的配置格式,仅有少量ji场提供支持,其他ji场可使用下面这个项目将常见订阅转换为 sing-box 订阅格式: sing-box-subscribe你可以将这个项目部署到自己的 Vercel 中,然后使用以下的链接格式来将常见订阅转换为 sing-box 订阅格式:<URL>/url=<subscription_url>/&file=<sing-box_template_url> <URL>:这是你的 sing-box-subscribe 访问链接; <subscription_url>:这是你的订阅链接; <sing-box_template_url>:这是你的 sing-box 模板配置链接,你可以直接使用 我的模板。例如:https://sing-box-subscribe.vercel.app/config/url=https://xxxxxx?clash=1/&file=https://gist.githubusercontent.com/yangchuansheng/5182974442015feeeeb058de543a00fd/raw/45b11ff08188af021da98e7174923d719dc42dd9/gistfile1.txt如果你有多个订阅链接,需要先将订阅链接合并为一个链接,然后再进行转换,具体看参考 sing-box-subscribe 的官方文档。更多配置示例更多的配置示例可以参考这个项目: sing-box-examples这个项目针对每一个代理协议都提供了详细的配置示例,还有很多的骚操作,比如 将 Cloudflare 的 Warp 节点信息直接提取出来加到 sing-box 出站配置中去,妙啊!透明网关如果你想让局域网中的所有机器都能够根据规则智能分流,那就在局域网中找一台机器作为透明网关,在这台机器上运行一个 sing-box 就行了,不需要像 Clash 一样写什么乱七八糟的 iptables 规则,直接一个配置文件就行了,非常简单。通常我们使用软路由来完成这个任务,如果你不想使用软路由,那随便找一台机器就行了,当然最好还是使用 Linux 比较靠谱。在网关上运行 sing-box 之后,其他机器只需要将网关指向这台机器,便可以无痛开启魔法智能分流了。注意: 其他机器的 DNS 必须是公网 DNS,不能使用内网 DNS!你的 DNS 可以指向任意的公网 DNS,反正只要是公网就行,比如:114.114.114.114,因为 sing-box 会劫持局域网中的所有 DNS 请求。当然,如果你不想让 sing-box 劫持局域网中的所有 DNS 请求,可以使用如下的方案:首先在入站配置中添加一个监听端口:{ "inbounds": [ { "type": "direct", "tag": "dns-in", "listen": "0.0.0.0", "listen_port": 53 } ] }然后在路由规则中将 DNS 的规则改成如下的配置: { "route": { "rules": [ { "inbound": "dns-in", "outbound": "dns-out" } ] } }这样就保证了只有从 53 端口进来的流量才会进入 DNS 解析。重启生效后,将其他机器的网关和 DNS 均指向这台机器就可以了。如果你使用的是 DHCP,只需要在 DHCP 服务器中将 DHCP 分配的网关和 DNS 改成 sing-box 所在的机器 IP 即可。
-
Nginx反向代理教程 最近趁着黑五买了一个大盘鸡,但是直接访问速度很慢,于是决定利用快速访问的小鸡来反代比较好,网上找了半天,下面的代码好用。 location / { proxy_pass https://www.xboy.uk:80; # 后端服务器的地址 proxy_set_header Host $host; proxy_set_header X-Real-IP $remote_addr; proxy_set_header X-Forwarded-For $proxy_add_x_forwarded_for; proxy_set_header X-Forwarded-Proto $scheme; # 可选:处理WebSocket(如果需要) proxy_http_version 1.1; proxy_set_header Upgrade $http_upgrade; proxy_set_header Connection "upgrade"; # 可选:设置超时时间 proxy_read_timeout 60s; proxy_connect_timeout 60s; proxy_send_timeout 60s; }
-
LNMP添加ssl证书不成功的问题 最近重新做网站,结果发现SSL创建失败,经排查发现是LNMP带的创建SSL脚本acme.sh更换了证书提供商,从LETS encrypt 改为ZEROssl,查询教程,最终解决了该问题,整理如下。注意:由于v3,acme.sh使用 Zerossl 作为默认证书颁发机构 (CA)。需要先注册账户(一次性),然后才能颁发新证书。另请参阅: https: //github.com/acmesh-official/acme.sh/wiki/Change-default-CA-to-ZeroSSL1.注册您的账户。1a. 使用电子邮件地址acme.sh --register-account -m [email protected] --server zerossl1b. 持有 EAB 凭证或者,如果您注册了一个ZeroSSL 帐户,acme.sh请使用外部帐户绑定(EAB)凭据进行引导,如下所示:从https://app.zerossl.com/developer生成您的 EAB 凭证注册您的 EAB 凭证。acme.sh --register-account --server zerossl \ --eab-kid xxxxxxxxxxxx \ --eab-hmac-key xxxxxxxxx拥有 ZeroSSL 账户的用户可以从开发者控制台管理颁发的证书。2.颁发证书使用 Zerossl.com 进行以下操作--server zerossl:acme.sh --server zerossl \ --issue -d example.com \ --dns dns_cf如果不想--server zerossl每次颁发证书时都指定,可以设置zerossl为默认CA:acme.sh --set-default-ca --server zerossl阅读:https ://github.com/acmesh-official/acme.sh/wiki/Server从zerossl颁发任何证书,无需指定--server:acme.sh --issue -d example.com --dns dns_cf故障排除Le_OrderFinalize:必须指定 KeyID如果证书颁发失败,并且您在日志中看到类似这样的内容[XYZ 18 09:50:07 -02 2020] Create new order error. Le_OrderFinalize not found. {"type":"urn:ietf:params:acme:error:malformed","status":400,"detail":"A Key ID MUST be specified"}然后,重新生成您的 EAB 凭证(参考步骤 2)并重新运行证书颁发。请参阅:acme.sh/issues/3310。
-
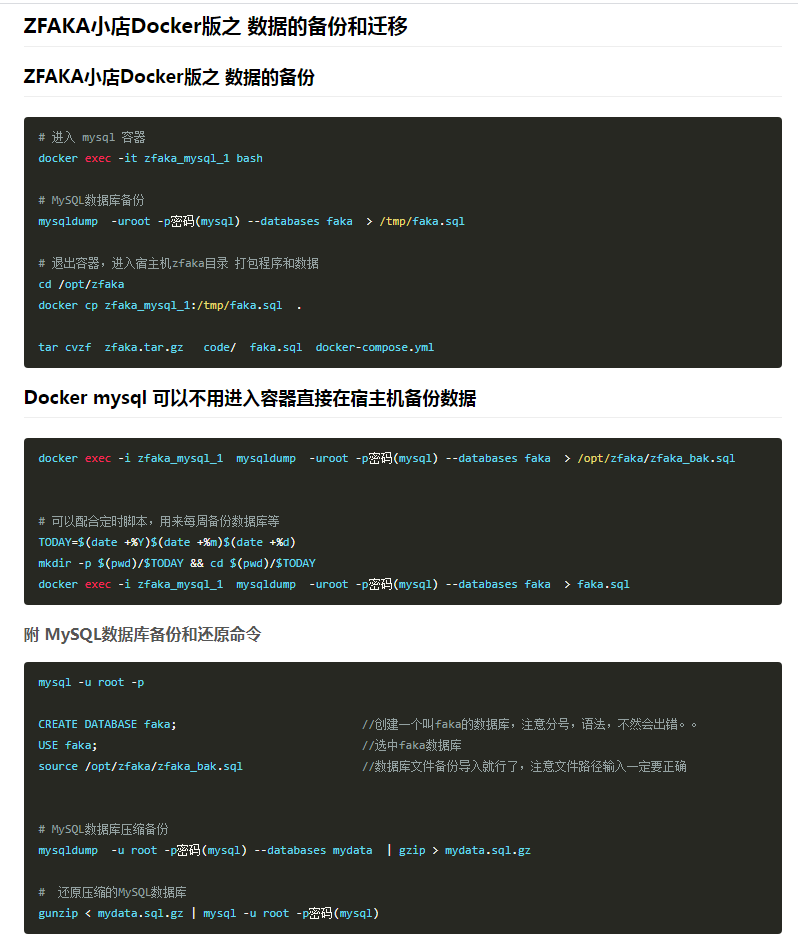
ZFAKA小店Docker版之 数据的备份和迁移 ZFAKA 程序因为要使用 MYSQL,对VPS还是有一定要求,至少1H1G才能跑,官方推荐是 2H2G。所以之前也只是在本地群晖上搞了Debian学习设置玩下。这次购买了 6.18元的阿里云MYSQL,准备里折腾玩一下,零成本把 ZFAKA 放到网上折腾一下ZFAKA小店Docker版之 数据的备份和迁移使用 HeidiSQL 远程连接 mysql 如图运行 sql 就可以方便恢复原来的数据了阿里云的 mysql 说做任务送20优惠券,也不知道送到哪里了修改数据库链接配置 vim code/conf/application.ini如图修改,停掉本地的MYSQL服务,测试阿里云SQL连接正常


![解决 nginx报错: [warn] the "listen ... http2" directive is deprecated, use the "http2" directive instead in /usr/local/nginx/conf/vhost/xxx.com.conf:18](https://www.vvars.com/usr/themes/Joe/assets/thumb/39.jpg)