1 前言
原帖来自Nodeseek的BlackSheep大佬。
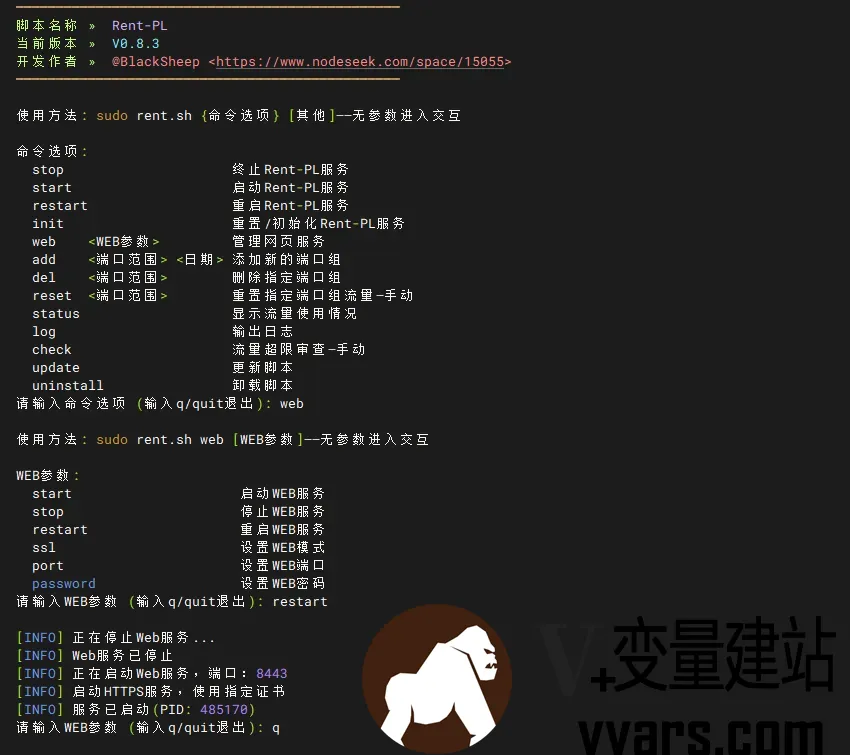
Rent-PL是一个端口流量限制脚本,对用户指定的端口组进行流量的统计、限制与周期性重置
1.1功能特点
基于iptables及cron实现了端口流量统计、流量超限拦截和流量定期重置三大核心功能
高可用性,支持TCP+UDP、IPv4+IPv6
低破坏性,不会改动已有的iptables规则及cron任务
高灵活性,支持添加多组端口/端口范围/两者的组合
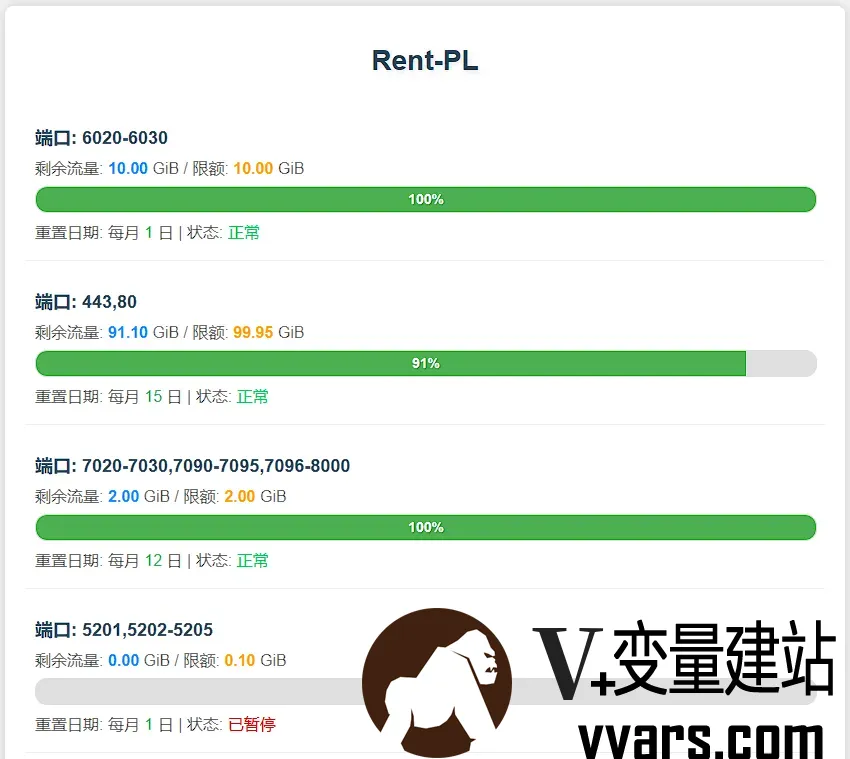
简易WEB服务,查询流量无需登录机器
统计指定sports+出站及指定dports+入站的流量——用于转发、代理类用途时,可视为单向流量
1.2项目地址
GitHub:https://github.com/BlackSheep-cry/Rent-PL
Raw链接:https://raw.githubusercontent.com/BlackSheep-cry/Rent-PL/main/rent.sh
2 快速使用
以下以Debian/Ubuntu系统为示例
2.1安装依赖
sudo apt update && sudo apt upgrade
sudo apt install iptables bc python3 wget nano openssl
其他部分发行版可能还需手动安装cron (cronie/dcron)
2.2下载并启动脚本
wget -q https://raw.githubusercontent.com/BlackSheep-cry/Rent-PL/main/rent.sh -O /usr/local/bin/rent.sh && chmod +x /usr/local/bin/rent.sh && rent.sh set2.3端口配置模板
配置格式:单端口/端口范围/两者的自由组合 月度流量限制(GiB) 重置日期(1-28日)
例如 :
6020-6030 100.00 1
443,80 1.5 15
5201,5202-5205 1 20
7020-7030,7090-7095,7096-8000 10 12
PS: 组合端口时请用英文逗号隔开,端口 流量 日期三个参数中间用空格隔开
2.4交互模式
sudo rent.sh2.5命令行模式
sudo rent.sh 命令选项 其他3 Nginx配置
WEB服务中如果选择模式1则需要自行在本地配置Nginx/Caddy等作为前置,楼主在这里为不熟悉的朋友提供一个简单的Nginx配置教程
3.1安装Nginx
apt install nginx3.2修改配置文件
nano /etc/nginx/sites-available/rent.conf3.3配置模板(默认443端口,http重写至https)
server_tokens off;

client_max_body_size 1m;

server {
    listen 443 ssl http2;  # 标准HTTPS端口
    server_name your.domain;  # 修改为您的域名

    ssl_certificate /etc/nginx/ssl/rent.crt;  # 修改为您的证书路径
    ssl_certificate_key /etc/nginx/ssl/rent.key;  # 修改为您的私钥路径

    ssl_protocols TLSv1.2 TLSv1.3;
    ssl_prefer_server_ciphers on;
    ssl_ciphers ECDHE-ECDSA-AES128-GCM-SHA256:ECDHE-RSA-AES128-GCM-SHA256:ECDHE-ECDSA-CHACHA20-POLY1305:ECDHE-RSA-CHACHA20-POLY1305:ECDHE-ECDSA-AES256-GCM-SHA384:ECDHE-RSA-AES256-GCM-SHA384;
    ssl_ecdh_curve secp384r1:X25519;

    ssl_session_timeout 10m;
    ssl_session_cache shared:SSL:10m;
    ssl_session_tickets off;

    ssl_stapling on;
    ssl_stapling_verify on;
    resolver 8.8.8.8 1.1.1.1 valid=300s;
    resolver_timeout 5s;

    add_header Strict-Transport-Security "max-age=63072000; includeSubDomains; preload";
    add_header X-Content-Type-Options "nosniff";
    add_header X-Frame-Options "SAMEORIGIN";
    add_header X-XSS-Protection "0";
    add_header Content-Security-Policy "default-src 'self'; script-src 'self' 'unsafe-inline'; style-src 'self' 'unsafe-inline'; img-src 'self' data:; report-uri /csp-report;";
    add_header Referrer-Policy "strict-origin-when-cross-origin";

    location / {
        limit_except GET HEAD {
            deny all;
        }

        proxy_pass http://localhost:8080;  # 修改为您的WEB端口
        proxy_http_version 1.1;
        proxy_set_header Connection "";

        proxy_set_header Host $host;
        proxy_set_header X-Real-IP $remote_addr;
        proxy_set_header X-Forwarded-For $proxy_add_x_forwarded_for;
        proxy_set_header X-Forwarded-Proto $scheme;

        proxy_buffering off;
        proxy_request_buffering off;

        proxy_connect_timeout 10s;
        proxy_send_timeout 15s;
        proxy_read_timeout 30s;
    }

    location ~* ^/(\.git|config|backup) {
        deny all;
        return 403;
    }
}

# HTTP重写至HTTPS
server {
    listen 80;
    server_name your.domain;  # 修改为您的域名
    return 301 https://$host$request_uri;
}
3.4启用站点
ln -s /etc/nginx/sites-available/rent.conf /etc/nginx/sites-enabled/3.5重载Nginx,配置完毕
nginx -s reload3.6禁用站点
rm /etc/nginx/sites-enabled/rent.conf4使用截图


5注意事项
1)问题反馈:主日志在/var/log/rent.log,WEB日志在/tmp/web_service.log
2)如果你使用iptables进行流量转发,请将落地机和中转机端口保持一致,否则脚本无法正常统计流量
3)status命令显示的月度限制发生变化是预期行为,而WEB中不会发生变化
4)如果你设置的端口在动态端口范围内(可用查询),请确保端口有服务在监听,否则有小概率多统计流量
PS:修改动态端口范围也可以,但不太建议:,写入新范围——不能太小,否则高并发下端口会耗尽,最后应用即可
sysctl net.ipv4.ip_local_port_range
sudo nano /etc/sysctl.conf
net.ipv4.ip_local_port_range = xxxxx xxxxx
sysctl -p

评论 (1)